If you're a seasoned pro, and you just want the broad overview, please see TL;DR.
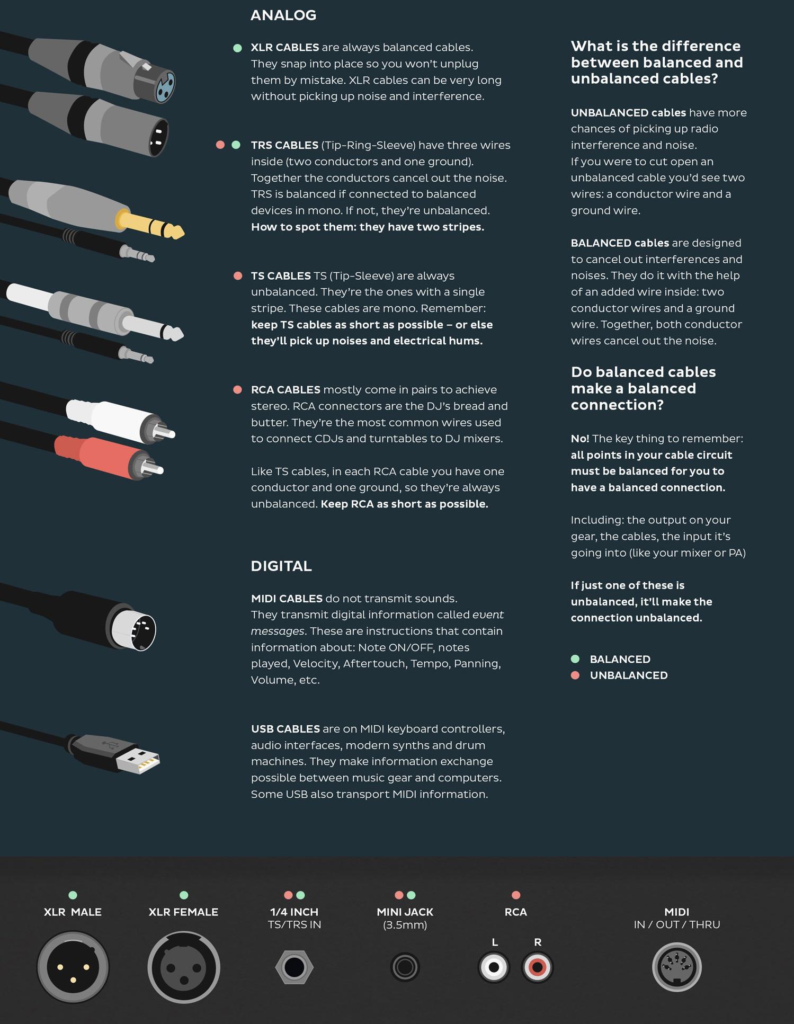
If you're still learning, please briefly read this primer on audio cable types from /r/coolguides:
Glossary of terms:
Signal Path is the route a particular signal takes through a chain of equipment and/or electronic components on the way to its destination
Signal flow is the order of operations a signal goes through
Line level audio a signal transmitting analog audio from components such as CD and DVD players, television sets, computers, and audio mixers and at approximately +4 dBu (using XLR or balanced TRS 1/4" connectors) or -10 dBu (using unbalanced TS 1/4", RCA, or 1/8" connectors)
Microphone level audio is a signal transmitted from a microphone to a microphone preamp, which will boost the signal to a level that can be used easily by line-level components (like this mixer). It's signal is typically between -60 and -40 dBu. Microphones almost always use XLR or TRS 1/4" connectors.
DI boxes can take an unbalanced, high-impedance signal and convert it to a balanced, low-impedance signal. This allows you to run guitar and bass directly into microphone preamplifiers or to send signal over extended cable runs without losing volume and significant high-frequency information.
Powered speakers, also known as self-powered speakers, or active speakers, are loudspeakers that have built-in amplifiers.
Here are some basic concepts to familiarize you with how this mixer, and mixers in general, work. It will be specific to the Onyx 8, since that's what we use, but the way it operates is pretty common, so this knowledge can easily be applied to using other mixers you might encounter in your career.
TL:DR; Just tell me how to hook the stuff up
To use the mixer and two powered speakers, you will need the following:
- (2) Speaker stands (both are usually kept in one carrying bag)
- (2) XLR cables to connect between mixer and speakers - one for each speaker.
- These should be at about 10 ft longer than you want to position the speaker away from the mixer
- (3) 3-prong AC power cables for all 3 devices
- (1) Power conditioner as a power source (to protect the equipment against power drops and spikes)
- (probably) 1-3 extension cord(s) and/or power strip.
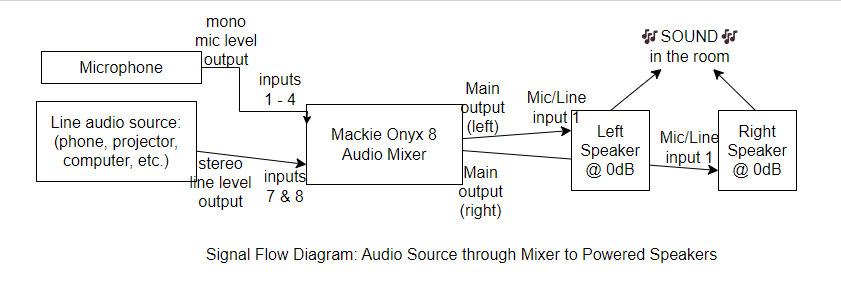
If you can read that flow diagram above and understand what it means, it might be enough information to set up the equipment. If you have any questions, or have no idea what it means, please read on...
Big picture: Understanding your signal path and conceptualizing the flow of your signals
Understanding signal path and signal flow will help you with all other aspects of using the equipment:
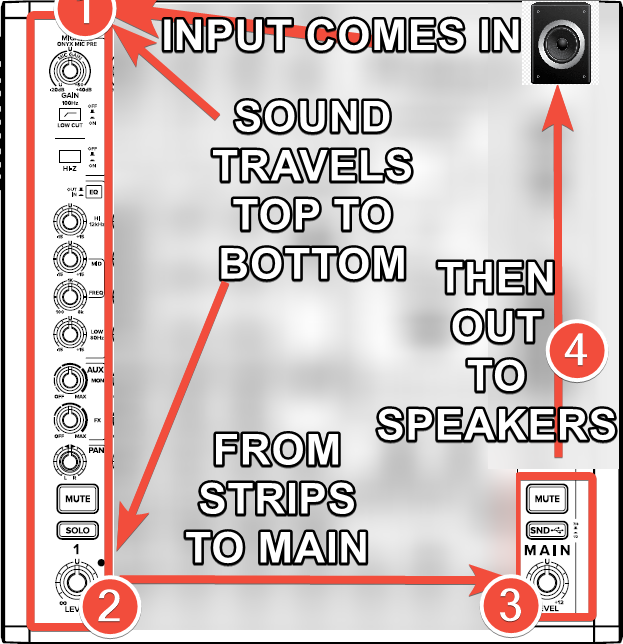
There's a direction which a signal enters and exits the mixer. Audio enters the mixer through input connectors, is processed by the mixer (volume, eq, effects, etc.) and lastly is sent through output connectors to the speakers.
Let's cover each one of these steps:
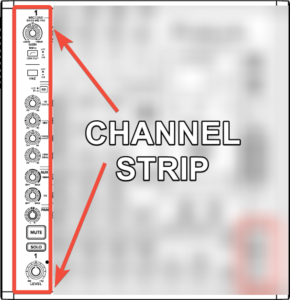
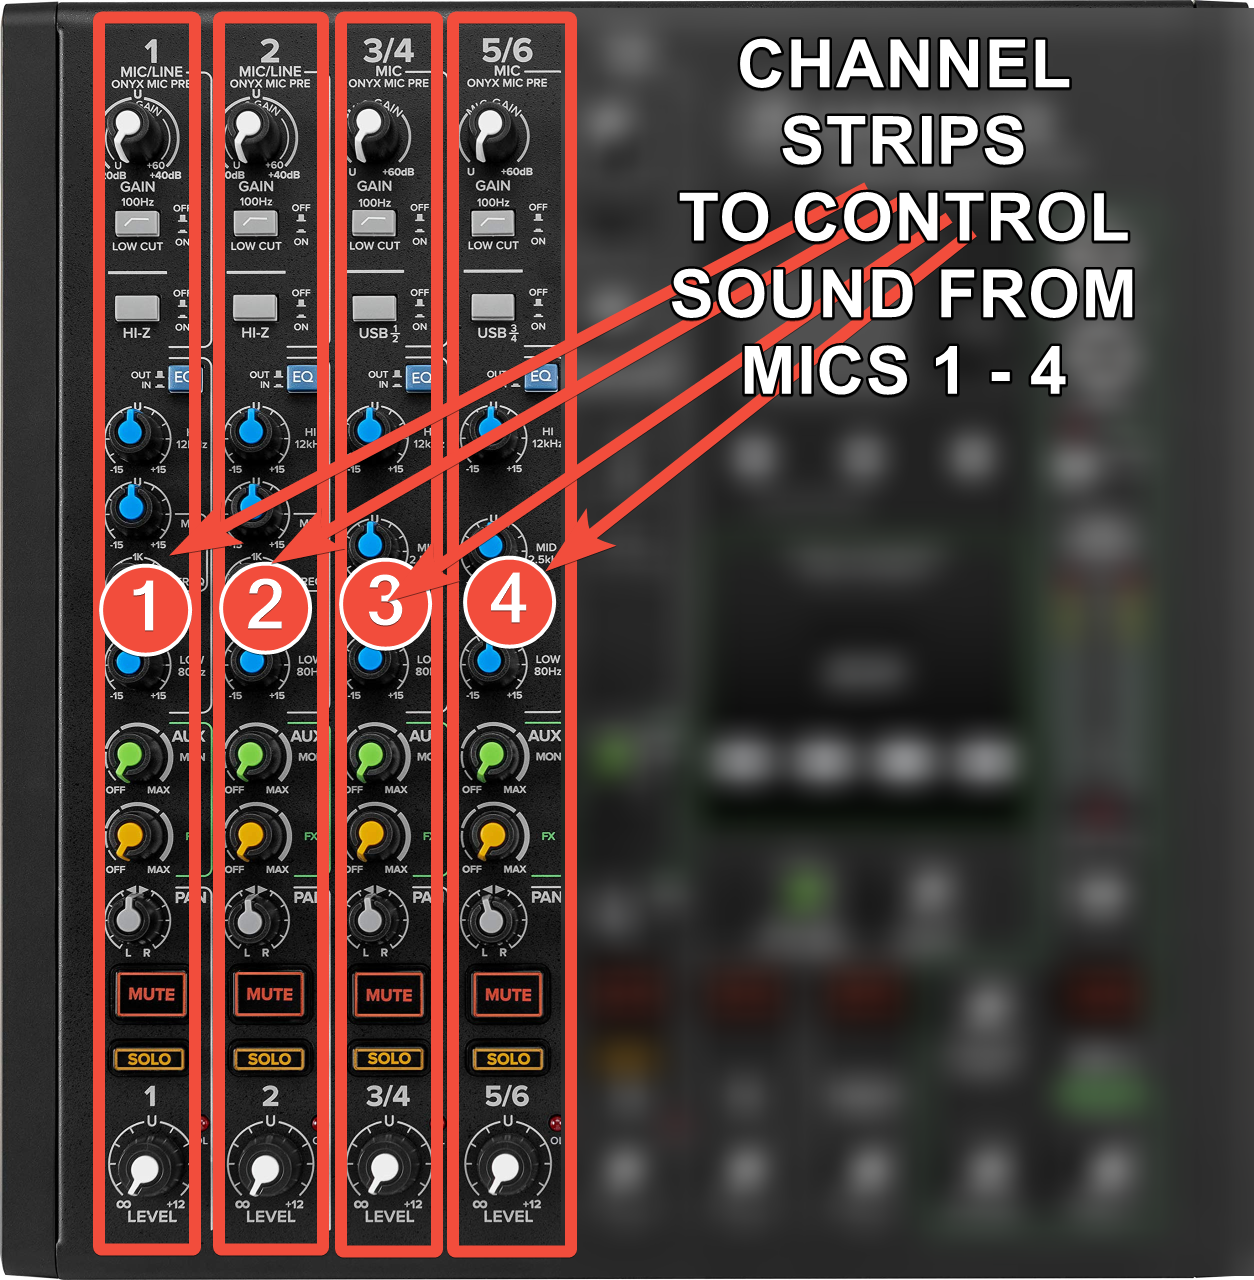
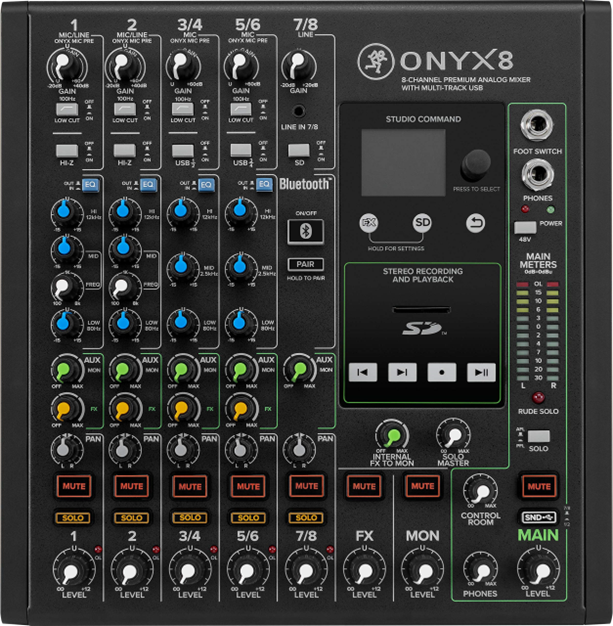
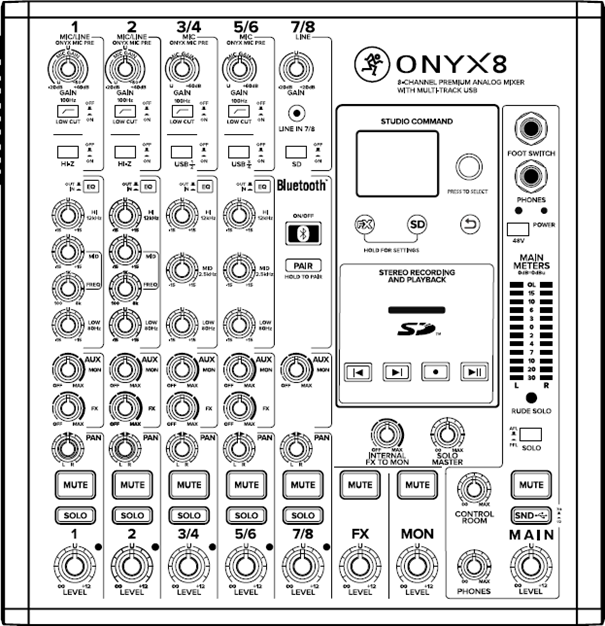
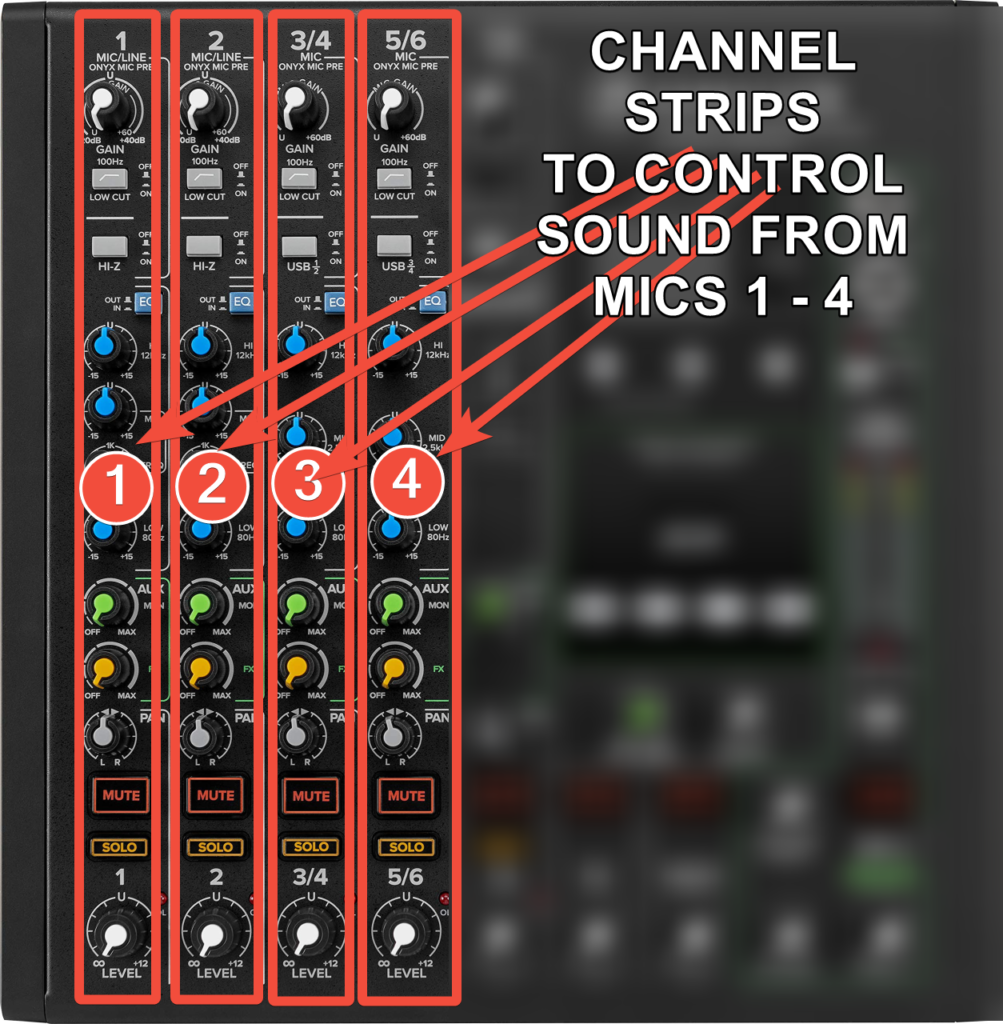
The mixer has buttons and knobs arranged in columns. These are called channel strips. Each channel strip's buttons and knobs are designed to affect one signal path for that channel.
Each channel strip corresponds with one or more input connectors on the back of the mixer. The Main Output Level knob corresponds with the main output connectors.
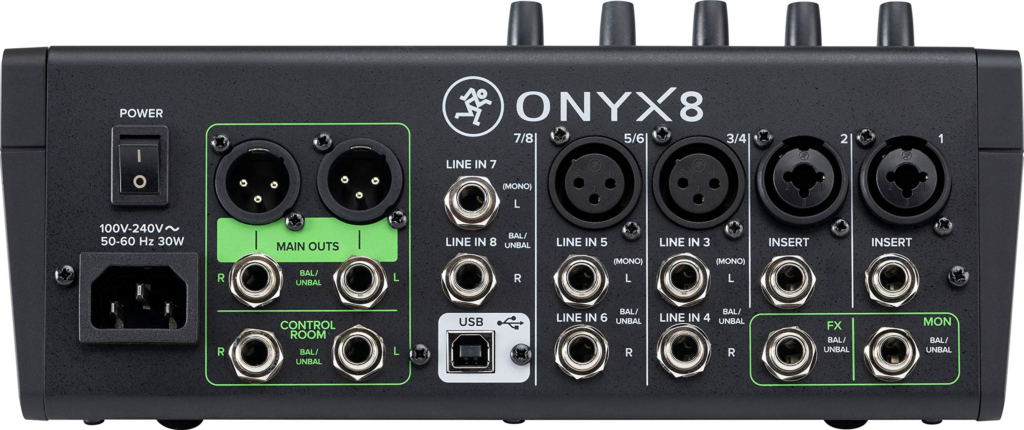
On the back of the mixer, you will find input and output connectors. The input for each channel strip is directly behind that strip. This is where you will connect your audio sources, such as microphones:
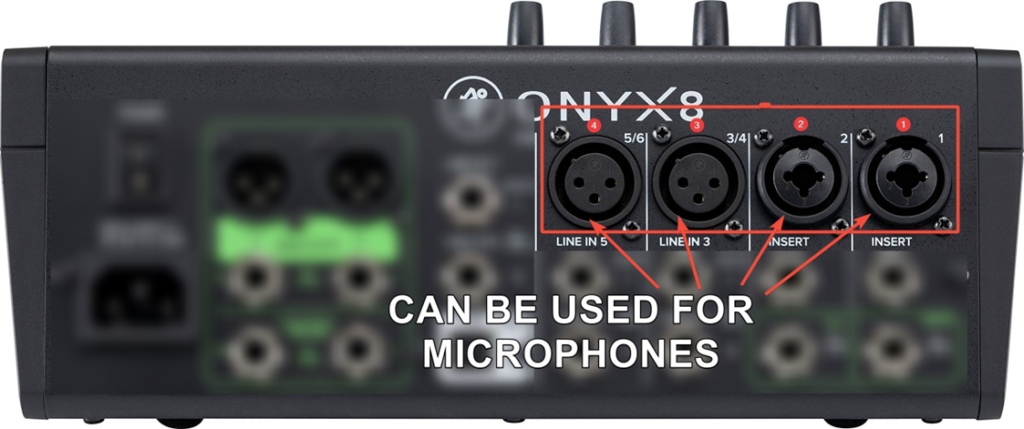
Input connectors 1 through 4 are capable of being microphone inputs, so if you need to connect a microphone, you'd want to connect to these connectors, starting in the order of 1 to 4 (right to left).
These four inputs correspond with the first four channel strips on the top of the mixer:
The rear of the mixer is also where you'll connect line audio sources, such as a phone, computer, tablet, projector, CD player, etc.:
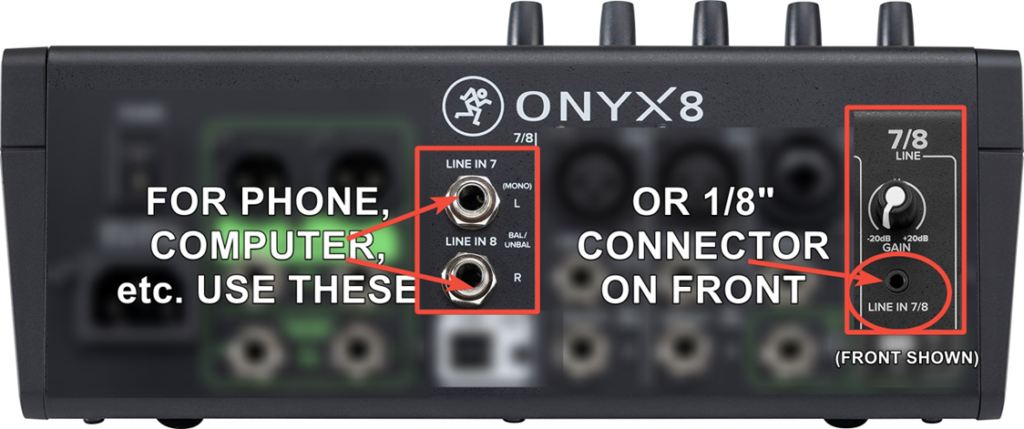
Input connectors 5 through 8 are line inputs, so that's where you'd want to connect your projector, CD player, phone, etc.
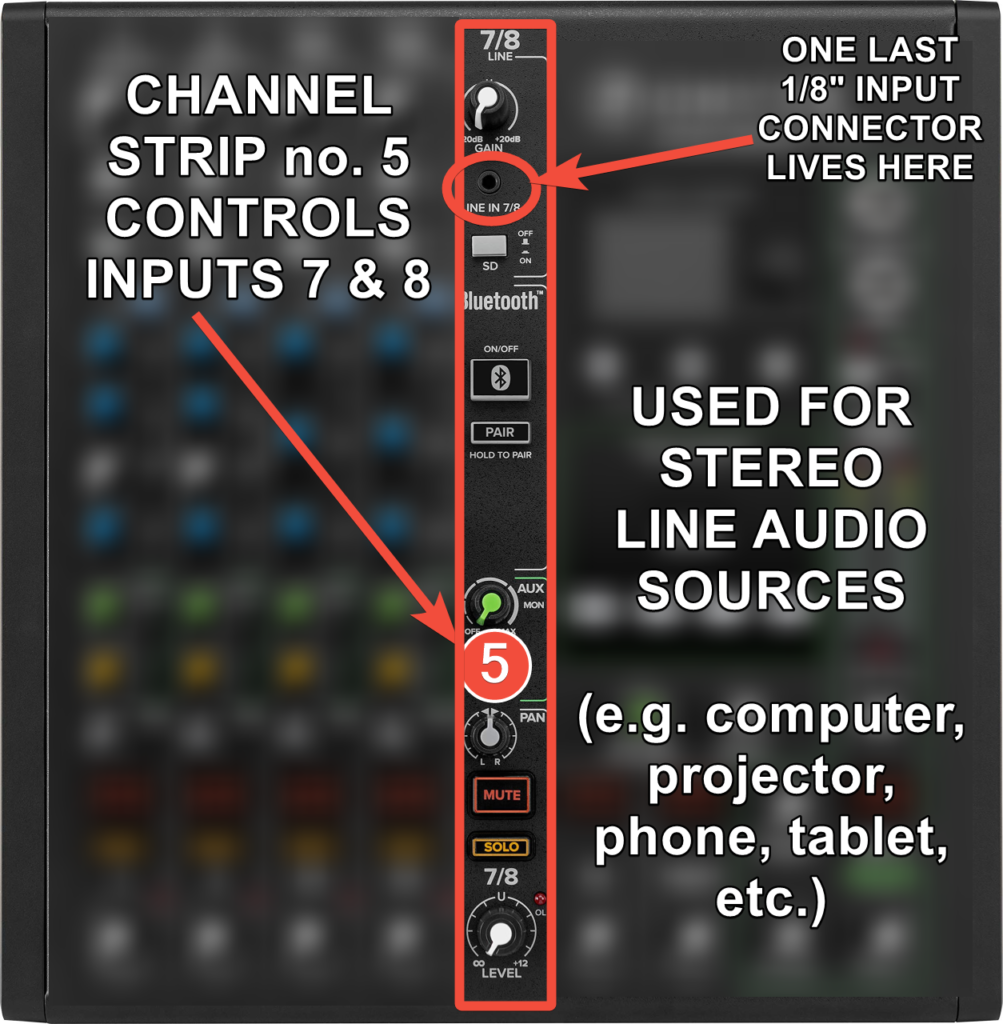
We'd usually start with inputs 7 & 8. If you need more line inputs, there's 5 & 6. Note: Line inputs 7 & 8 have an 1/8" connector on the top of the mixer, too
Lastly, after you feed your signal into the mixer, you want to be able to send it out to your speakers. To do that, you'll want to use the main outputs (formerly called master), located on the left if you're facing the back of the mixer.
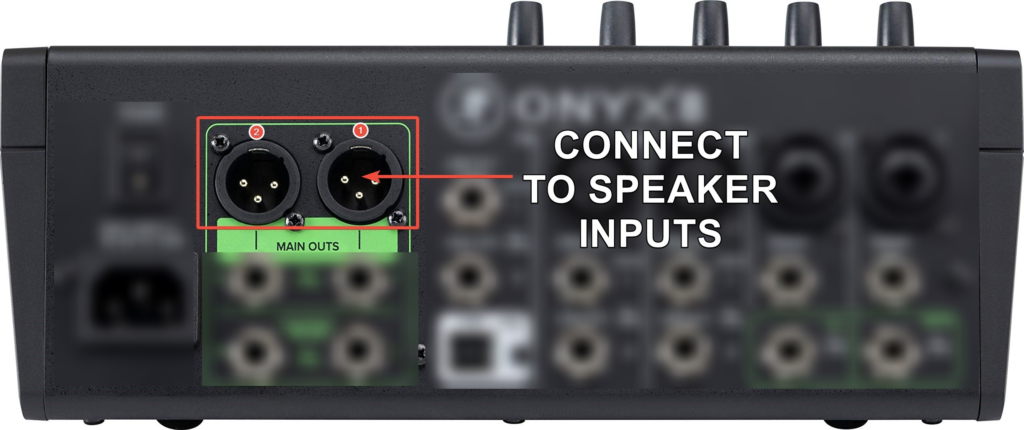
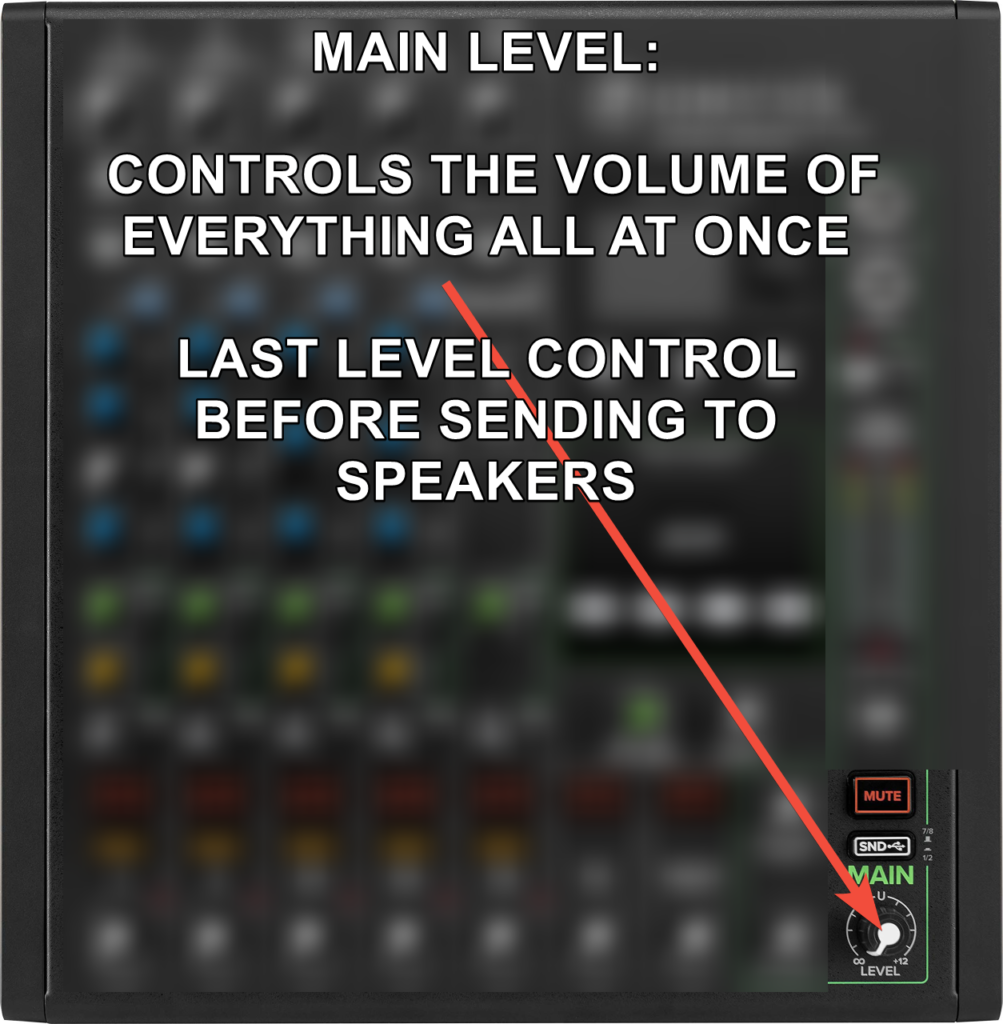
The last knob on each channel strip is how much of the signal will be sent to main, and main is the last knob that can set the strength of our signal before it goes to our speakers. Unlike each channel strip, the level on main sets the level for everything all at once before being sent out to our speakers.
To re-cap, the process of starting with an audio signal, feeding it into the mixer, through the mixer and then out to the speakers is called signal flow, and the route the signal takes is the signal path.
Finally, after we're done processing the sound with the mixer, the signal from the mixer is sent to our speakers.
Our Speakers: Presonus AIR10 2-way Powered Speakers
Setting up the speaker stands
- Put the speaker stands up approximately where you'd like the speakers to go. Keep in mind you need about 10 ft more cable than distance you can place the speakers away from the mixer, so you can tape them down (safety first!)
- Loosen the clamp for the feet of the stand and telescope the feet so they open as far as possible
- When you place the feet on the floor, press down on the center pole. You should feel the feet adjusting to their most stable position once the pole is down as far as it can go easily
- Tighten the clamp for the feet so they are locked into place
- Open the clamp for the top (telescoping portion) of the stand, and extend the inner post upwards until you find a hole.
- Once the hole is exposed, place the peg hanging underneath the clamp through the hole so the 2 grooves on it are aligned with the outside of the pole, and tighten the clamp where the telescoping will be stopped by the peg.
- Each speaker has a mounting hole in its bottom the size of the telescoping portion of the pole. Carefully pick up a speaker and place it onto the pole, with the post deep into this hole.
- The pole will go in about 6-8" and will be firm, but not tight, allowing the speaker to turn if necessary. At this point, you're done with the first speaker: Repeat the same steps for the other speaker.
Understanding and using the speakers
Presonus Air 10 PA speakers are 2-way active public address speakers. 2-way means there are two speakers in each cabinet (tweeter and woofer), and powered means they have an amplifier built-in.
Quick note: It's best to wait to power up the mixer and speakers on until after the cables are connected, as they're less likely to produce transients (aka loud popping noises). If guests are present, please try your best not to frighten our guests.
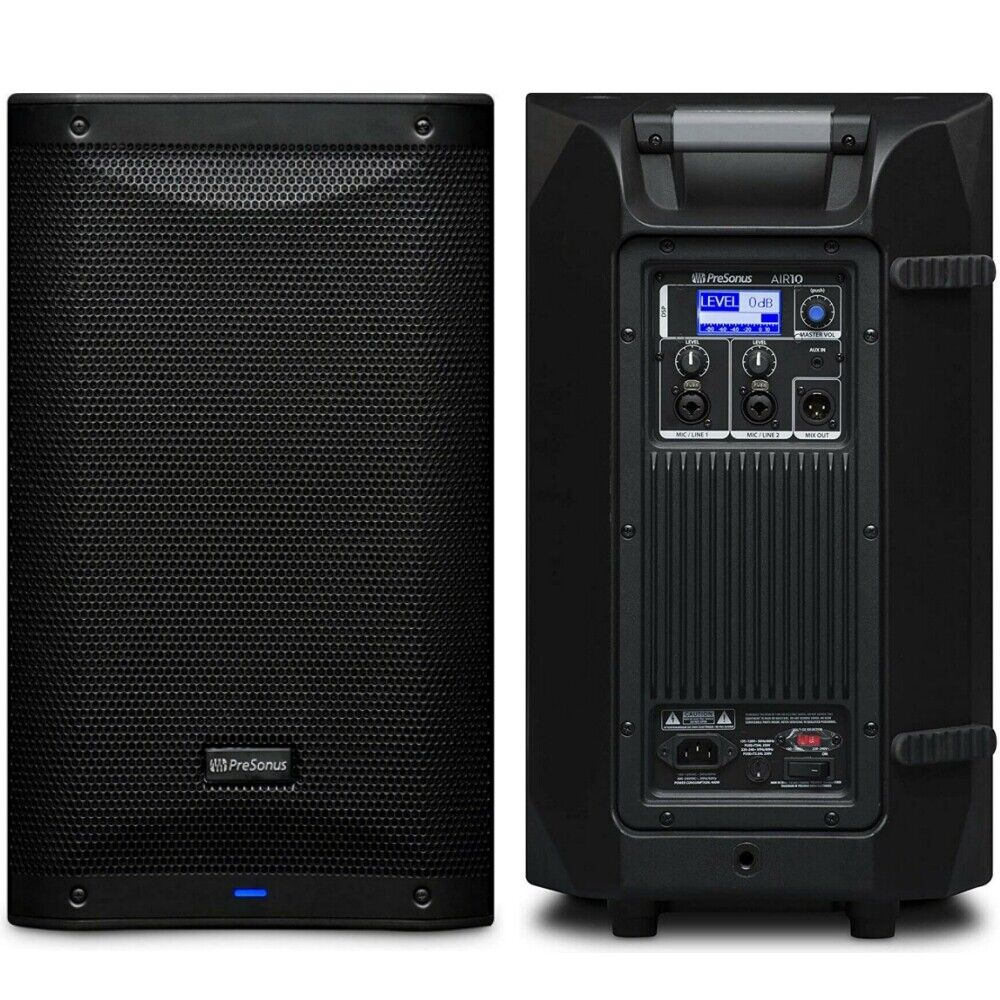
Here's a look at the rear panel where you'll be connecting the output from the mixer:
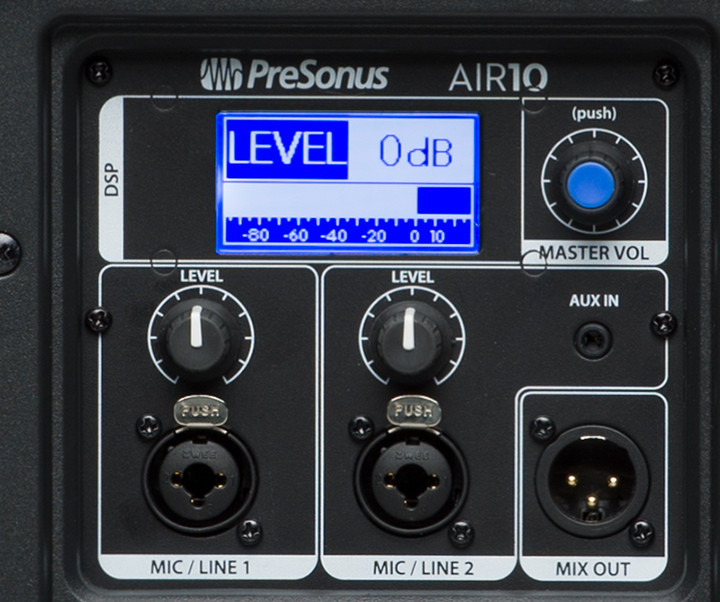
It looks slightly daunting at first, but I'll make it as straightforward to use as possible: Plug each side of the mixer's main outputs (L or R) into the first input on each powered speaker
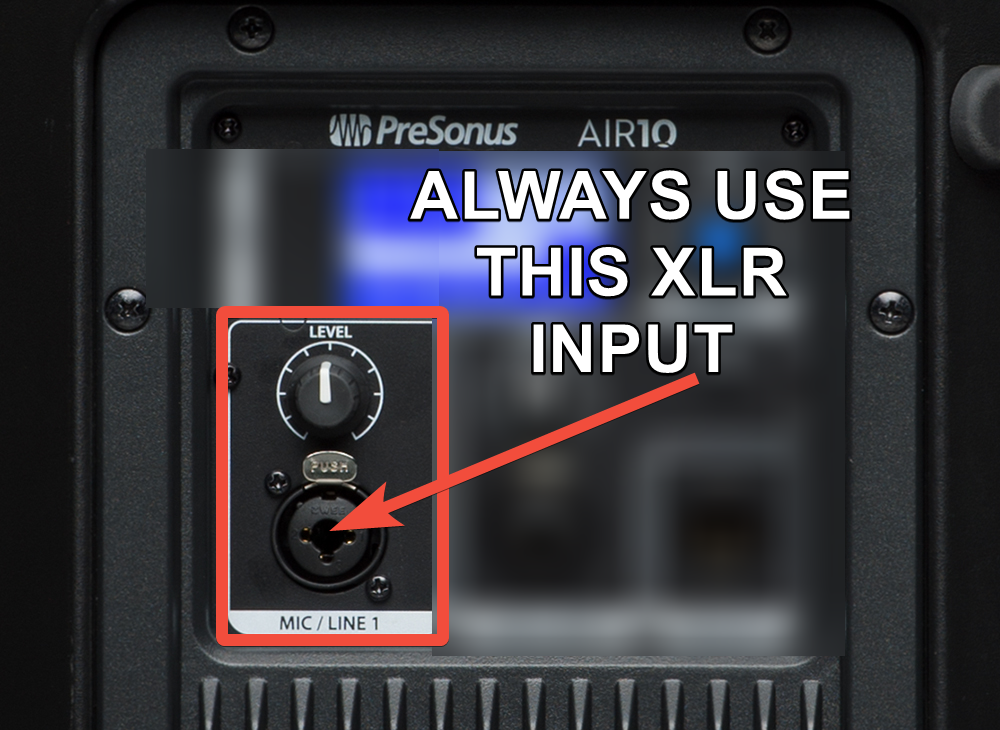
Then, set the knobs at 50% and you shouldn't ever have to worry about them again (maybe they'll already be there!).
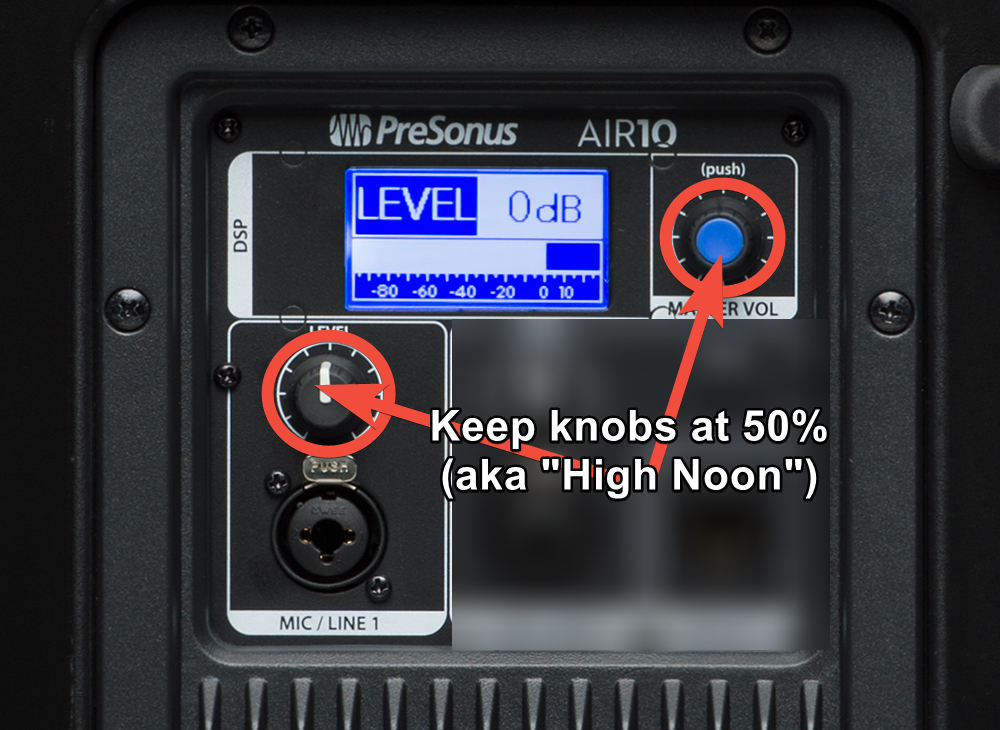
In fact, 50% is such a perfect level for these speakers, it reads as "0 dB". So every time you use these, leave both knobs right in the middle - they shouldn't need to be adjusted unless they're not pointing straight up. We'll be controlling all the volume of our mix with our mixer.
These speakers are potentially much louder than anything we'll ever use them for, but that provides us with plenty of headroom: Audio equipment tends to distort when it's turned up past 50%: please keep that in mind for all of the equipment as a general rule.
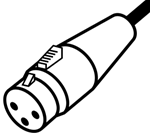
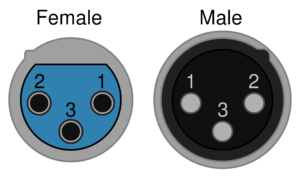
After setting the speakers on their stands, connect the male XLR connector of your cable to connect the speaker's input (aka "mic/line 1") and the female XLR connector to the Main Out L from the mixer. Note: Left and Right should be from the audience's perspective.
Repeat the same thing for your speaker on the right.
Connecting an audio source to the mixer
Lastly, now that we have our mixer and speakers set up, let's connect something to the mixer and test our system out.
Microphone: Connect the female XLR connector of your cable to the bottom of your microphone, and the male XLR connector to the back of the mixer, corresponding with one of the first four channel strips (1-4). Note: This is typically done right to left from the back as it ends up being left to right in the front.
Using a Channel Strip: Basic Concepts
- "Normalize" each channel of the mixer when you first start using it: Return the gain and eq levels to 50%, and the bottom level knob to 0%
- You can quickly "mute" your channel if it's starting to feedback, and you need to get rid of it ASAP
- You can "solo" any channel if that's helpful for some reason (adjust without interference, etc.)
- Make sure "HI-Z" is off unless you plugged a guitar into that channel
- AUX level won't effect anything unless you're using the AUX connectors on the back
- Always start with level (bottom knob) set to 25% or less and work your way up
- Channel level knob (bottom) is one that's eventually OK to turn up all the way if you have to, but it's nice to leave some room to play with in case you need it
- Gain (top) and channel level (bottom) work together, but do different things: Gain will help even out the "torque" of the level knobs across the channels, but the channel level knob is designed for setting the overall volume of the channel - a common mistake is reversing these two roles
- You can set the gain between 0-50% initially, but it's best not to go past 50-60% unless absolutely necessary: check interaction with the channel level knob (bottom) first
Channel Strip: Setting EQ levels
- Recommendation: Boost EQ sparingly, cut liberally - especially low frequencies for mics!
- Start with EQ "flat" (normalized) meaning all knobs are at 50% (point straight up)
- Channels 1 and 2 have an adjustable center frequency: Probably the most helpful type of EQ for accentuating (or eliminating) a specific frequency range. Try it out!
- If you're trying to adjust the EQ and it doesn't seem to be doing anything, make sure the "on/off" button is set to "on" (in)
- EQ on/off can be a great way for testing if your EQ settings help sound quality without changing where the knobs are set
Channel Strip: Finer points for mics
- You often have to set wildly different gain (first knob) for different microphones and people's speaking / mic holding habits: don't be afraid, just be careful
- Recommendation: Low Cut makes people "sound better"*. Turn it on every time you're using a microphone.
- Never turn on "HI-Z" for a microphone (it's basically an on/off button)
- FX are awesome for voices, but I'm not going to cover them here
(*why does low cut "make people's voices sound better"? Because people's speaking register is in the mid frequency range, so low frequency sounds coming from their channel is almost always interference and transients)
Tips for using Main Level section:
- Start with Main Level at 25% or less and work your way up, unless you're sure all your channel strips are normalized (set to 0%)
- If you panic, hit MUTE and lower some levels before you turn it off.
Tips for TROUBLESHOOTING:
- Don't be embarrassed to check things that are typically obvious
- Make sure you hit every step in the signal's path:
- Work "backwards" (opposite direction of signal flow)
- e.g. are the speakers on? OK,
- speakers plugged in? OK,
- mixer on? OK,
- main level up? OK,
- channel level up? OK,
- source plugged in? OK,
- HI-Z not on?
- Gain turned up?
- microphone on (if it has a switch)? OK,
- person making noise into the mic… ? ... say something ...


No comments yet